Custom chenille patches have long been associated with varsity jackets, team spirit, and a sense of belonging. The plush, textured look of chenille makes it stand out from other patch styles and offers a soft, eye-catching appeal that works for everything from classic letterman jackets to trendy hoodies and hats. Today, the popularity of chenille patches has grown beyond schools and sports teams, with brands, designers, and even hobbyists using them to create bold statements on clothing, accessories, and promotional items.
If you are considering adding chenille patches to your project, the process can feel overwhelming at first. From choosing the right design and colors to understanding production details, there are several steps to creating a patch that perfectly represents your vision.
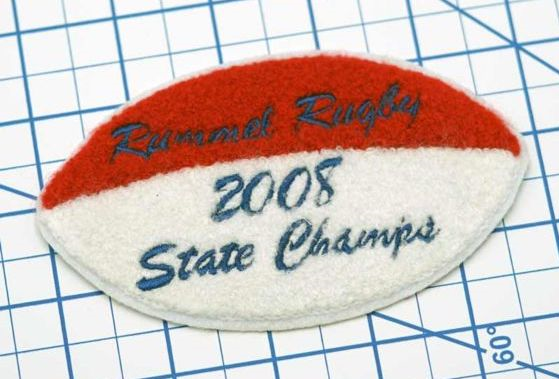
Step 1: Start with Your Concept
The first step in creating a chenille patch is defining your concept. Think about the purpose of your patch. Is it meant to showcase team pride, highlight your brand, or add a stylish accent to apparel? Once you know the “why” behind your patch, you can begin sketching or brainstorming the design.
Common concepts include:
- Letters and Numbers: Ideal for varsity jackets and uniforms, these patches communicate pride and tradition.
- Logos and Symbols: Great for brands or organizations that want to be recognized at a glance.
- Creative Graphics: Custom shapes, mascots, or themed illustrations allow for maximum personalization.
The design stage sets the foundation for everything that follows, so it is worth spending time refining your ideas before moving on.
Step 2: Choose Your Colors
Chenille patches are known for their bold use of color. The textured yarns resemble towel material and can be dyed in almost any shade. Most suppliers allow up to eight colors per design, which is usually more than enough for clear and vibrant results.
When selecting colors, think about:
- Contrast: Use lighter and darker shades together so your design is easy to read.
- Brand or Team Colors: Stick to established color palettes for recognition and consistency.
- Fashion Trends: If you want your patch to make a stylish statement, consider seasonal or trending colors.
Remember that chenille often appears slightly softer in tone compared to embroidery thread, so factor that into your decisions.
Step 3: Determine the Shape and Size
Custom chenille patches are cut to shape, which means you are not limited to simple circles or rectangles. You can request letters, numbers, mascots, or even more intricate outlines. This flexibility allows you to design something truly unique.
For size, consider where the patch will be applied. A large chest piece on a varsity jacket might measure six inches or more, while smaller patches for hats or sleeves might be two to three inches. Choosing the right size ensures your patch looks balanced and practical for its intended use.
Step 4: Decide on Backing and Felt Options
Every chenille patch needs a backing material. Typically, felt is used to support the chenille yarn and maintain its shape. You can choose a contrasting felt color to outline your design or a matching shade for a seamless look.
Additionally, consider the type of backing that will be applied for attachment. Options often include:
- Sew-On: Classic and durable, ideal for jackets or garments.
- Iron-On: Convenient for quick application.
- Velcro: Useful for removable or interchangeable patches.
The choice depends on how and where you want to display your patch.
Step 5: Add Embroidered Details if Needed
While chenille creates a soft, fluffy texture, it does not always capture fine details like sharp outlines or small lettering. To solve this, embroidery is often added to highlight specific areas or create borders. Combining chenille and embroidery ensures your patch looks both bold and precise.
For example, you might use chenille for a large block letter and embroidery to define the edges or add smaller text inside. The result is a polished, professional patch with depth and clarity.
Step 6: Request a Sample Photo
Before your patches go into production, most suppliers will send you a sample photo of your design. This allows you to see how the final product will look and request any changes before approval. Taking advantage of this step can save time and ensure your vision translates correctly.
Step 7: Approve and Finalize Your Order
Once you are happy with the sample and artwork proof, it is time to approve your design. After approval, your supplier will provide an estimated ship date and begin producing your custom chenille patches. Depending on the quantity and complexity, turnaround times can be quite fast.
Bringing Your Design to Life with Custom Woven Labels
Designing custom chenille patches may seem like a detailed process, but with the right partner, it becomes smooth and straightforward. At Custom Woven Labels, you can create patches with up to eight colors, soft chenille material, and optional embroidered details for precision. Our team provides graphic artwork assistance, free sample photo options, and fast turnaround so you never have to worry about delays.
All you need to do is upload your artwork and request pricing. Within one business day, you will receive a custom quote tailored to your design. From there, you will be sent a digital proof for approval before production begins. With our dedication to quality and customer support, Custom Woven Labels makes designing your own chenille patches simple, efficient, and rewarding.
The information below is required for social login
Sign In
Create New Account